
Yeah, Terraform is cool and all. But that’s typically done locally. The cloud is even better, and free.
Why would I do this?
There are tons of reasons you may want to deploy with Terraform in the cloud. A few of my personal favorite highlights are…
- Less load put on local hardware
- It’s still as simple as running locally
- It can be easily automated, especially if
gitis used- Runs can occur on a push
- It’s free
Requirements
- Knowledge with getting Terraform working locally
- An existing and working Terraform project
- FREE Terraform Cloud Account
Deployment Methods
As of May 2022, there are 3 methods to deploy code with Terraform Cloud:
- Version control workflow - Store your Terraform configuration in a git repository, and trigger runs based on pull requests and merges
- CLI-driven workflow - Trigger remote Terraform runs from your local command line
- API-driven workflow - A more advanced option. Integrate Terraform into a larger pipeline using the Terraform API
For the purposes of this post, we will only be going over the first two: Version control and CLI-driven workflows.
The reason? They are the most common, especially if you’re just getting started with Terraform. Most don’t have a need to run API-driven workflows.
📕 Method 1: Version control workflow
In this post, I will be using GitHub to keep my repositories. Any git provider will work, as long as it is internet-accesible. If you are new to git, this is typically a good place to start.
This method is best used if you want to automate your workflows, as this can be done via updates to the repository.
Extra requirements
- GitHub Desktop is a super useful tool for pushing changes to a GitHub repo without the command line.
- If you don’t want to use this, and know how to use gitbash, that is perfectly fine too!
NOTE: If you structure your Terraform projects as I do, your repository created below, you will need to update your .gitignore file to include *.auto.tfvars so that your credentials are not stored for just anyone to see (such as API tokens)
Create a Git repository
Login into GitHub
- Create a new repository with the “New” button

- Make sure this is set as
Publicto make things a bit easier- Setting this as private would require setting up SSH keys for Terraform Cloud to read the repo
- Give this repository a name, and initialize it with a
READMEfile and choose theTerraform.gitignoretemplate.
Clone repository locally
In GitHub desktop, login to your account, and add a new repository by searching for the one you just created.
- You’ll have to choose a location to store this, it would be best to keep this somewhere simple (such as a shorter path)
You can also clone the repository via the command line with:
| |
Set up Terraform Cloud
Head over to the Terraform Cloud web interface, and log in.
- Create a new
Organization, if needed. - Create a new
Workspacewithin the organization - Here you are presented with 3 options, make sure to select
Version Control Workflow - Get connected to your git provider
- This will open a new window, asking you to sign into your provider
- In the list that shows, select the repository you will be using
- By default, the workspace name will auto-populate with the repo name, probably best to keep this for readability’s sake
- Click
Create Workspace
Add variables to your workspace
The best and safest way to store variables for Terraform is to actually use Terraform Cloud. To create variables to use for your project, click on the Variables tab, and create each variable you have in your local project.
Now Terraform Cloud is ready!
Add Terraform configurations to repo
Now, find your working terraform project, and copy ALL of the files from there into your local repository location.
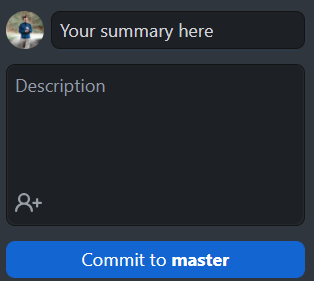
Once they are copied in, bring GitHub Desktop back up, enter a “Commit Summary” on the bottom-left:
And then at the top, push your changes to GitHub:

Stage changes in Terraform Cloud
Back in Terraform Cloud, click the Overview tab, and then Start new plan
- This is the equivalent to running
terraform planin the local CLI
Once the plan is complete, it will show you the changes it will make!
Run plan!
To run the latest plan, scroll to the bottom of the page and click Confirm and Apply.
- This is the equivalent to running
terraform plan -auto-approvein the local CLI
Now… Watch the magic happen.
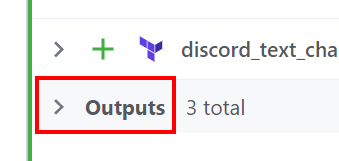
If your plan had Outputs, you can see those values by droping down the “Outputs” section:
Destroy infrastructure
To destroy the newly-created infrastructure, scroll back up to the top of the page, click Settings > Destruction and Deletion
Click
Queue destroy planEnter your workspace name to confirm
Click
Queue destroy planOnce the plan finishes, click
Confirm and applyThis is the equivalent to running
terraform destroy -auto-approve
⌨️ Method 2: CLI-driven workflow
This method uses the local command-line to trigger workflows in Terraform Cloud. A command that is run locally will actually perform in the cloud, showing a “remote window” of the remote CLI locally. You’ll see what I mean shortly…
Get Ready
As always for Terraform, cd into your project directory.
Get authenticated
So first, once you have your Terraform Cloud account, we’ll need to log into to the terraform CLI.
To do this, run:
| |
This will prompt you to type yes and automatically open a web browser to the page to create an access token.
- On this page, give the token a name, and hit create
- Then copy the token and paste it into your terminal session
- Note: This is the only time the token will show
- Then you’re logged in!
Set up Terraform Cloud
Head over to the Terraform Cloud web interface, and log in.
- Create a new
Organization, if needed. - Create a new
Workspacewithin the organization - Here you are presented with 3 options, make sure to select
CLI-driven workflow - Name your workspace
Terraform-CLI-Test - Click
Create Workspace - Take note of the
Example codefor CLI-driven runs
Create Terraform Cloud file
Now, we need a way to tell our local Terraform installation run the configurations in the cloud.
To do this, create a file called TerraformCloud.tf, and add the example code from earlier:
| |
Note: If using the above example, make sure to change the organization name to your own
Test ’er out
Now, this should be pretty much it. Assuming your project works correctly, you can now run all of the regular Terraform CLI commands locally, and they will execute in the cloud.
To test this out, try running terraform plan and check the web interface to see the plan in action.
Once that is all good to go, run terraform apply -auto-approve and watch the magic happen!
If that is all good, and you want to destroy it, just run terraform destroy -auto-approve.
Conclusion
Doing jobs with Terraform in the cloud is pretty cool. It takes the load off of local hardware, and allows the automation of workflows to be performed, and is just plain fun to use.
Hopefully this helped at least get your foot in the door for the wonders of Terraform Cloud, and feel free to comment if you have any questions!