
A static website is a plain and simple site with some HTML and CSS, without the need for a database or a beefy server.
Hugo is one of many different static site generators. The most popular is called Jekyll, and is a bit simpler to use than Hugo. It’s mostly personal preference, but here we’ll be going through setup for Hugo.
Requirements
- A computer running Windows / Mac / Linux / OpenBSD / FreeBSD
- IDE that supports YAML and Markdown
- Basic command line knowledge
- Basic understanding of websites (HTML, CSS)
In this post, I’ll be using Visual Studio Code as my IDE, you can download that here if you are interested.
Install Hugo
Firstly, you’ll have to install Hugo. This differs between operating systems… But the official instructions can be found here.
Below, you can find instructions for Windows and Linux systems.
Install on Windows
The best way to install on Windows is to use the chocolatey method. You can find installation instructions for that here
Once that is installed, run
| |
Install on Linux
If you want to use Linux, I found it’s best to get the latest version from Hugo’s GitHub repo releases page. If you try to install using apt, it will install an older version.
Download the latest release to a directory of your choosing
Ex:
| |
Confirm installation
To confirm you’ve installed Hugo, just run hugo --version in your command line
Generate Hugo site files
To get started, will need to generate site files that you can edit
- Open a terminal / command prompt
cdinto an empty directory on your machine- Run
hugo new site sitename - Run
lsto view all of the new files
Add theme to site
First thing you will need to do after creating a site is to add a theme to it. You can find a whole big list of themes directly from Hugo’s website here.
There are two methods to add a theme to a site… Via a git submodule or just copying all theme files into your site.
In this example, I will be using the PaperMod.
Git Submodule Method
The benefit to cloning a submodule from git is you can quickly update the theme without having to re-copy all files manually. Git will take care of this for you :)
- Find the theme you want, and go to its GitHub repository.
- Copy the URL of the repository
- Open a terminal session,
cdin to your new site directory - Run:
git submodule add --depth=1 https://github.com/adityatelange/hugo-PaperMod.git themes/PaperMod(substituting the URL of your chosen theme) - To update the submodule, run
git submodule update --remote --merge
Note: If your site is in a git repository, you must run git submodule add --depth=1 https://github.com/adityatelange/hugo-PaperMod.git themes/PaperMod to pull the submodule, as this is not done by default
Copy Method
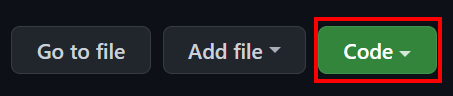
You can also just copy the contents of the repository by clicking the “Code” button on the GitHub repo, extract the files from the downloaded zip file, and place those in your themes folder.
File structure
As you may have noticed, Hugo created a bunch of directories for you, including the themes directory from the last section.
The most notable and important directories are:
- content
- Storage for Markdown files that will be used to generate pages
- layouts
- Storage for HTML files that are used as templates to place markdown data into
- static
- Storage for all static files the website will use, such as CSS and image files
- themes
- Stores the theme you are using for your site
Site configuration
Each site contains a configuration file, this can be either toml or yaml file types, and using one over another is dependent first on what your theme supports, and personal preference.
Typically, it is best to reference your chosen theme’s documentation to get base configuration to get started.
The default config.yml file for PaperMod can be found here. Feel free to make changes as you see fit.
Create your first page
Now it is time to create your first page!
First create a file named about.md under the content directory.
Now, paste in the following lines:
| |
Make sure to save the file.
View your configured site
To spin up a quick webserver on your local machine, run the command hugo server in the directory containing your site files.
This will generate the website files, and serve an HTTP server locally on your machine (the output of the command will give you the url).
By default, Hugo will server on port 1313, so you can open a web browser and go to http://localhost:1313
Once you’ve done this, there is your new site! If you want to check out the about.md page we created above, you can navigate to http://localhost:1313/about.
Extra note
If you want to generate all HTML files for this site, run the command hugo -v, this will create a directory named public and you can copy the files there to your webserver of choice.